Thursday, November 13, 2014

Paper Strip Cards

Somewhere I saw this technique, probably on a card posted on Pinterest, where you adhere strips of scrap papers to cardstock, then emboss that piece in an embossing folder. If desired, you can swipe an ink pad over the embossing to highlight it. Then it's ready to use on a card.

I LOVE this technique! I'm all about using my paper scraps up and this is a great way to do that. Of course, I didn't have nearly enough paper scraps so I even cut up perfectly good sheets of paper to add to my selection.

Here are some of the cards I've made recently using this technique. I have to admit that the autumn cards are my favorites. The diecuts are made on my Silhouette Cameo.


Wednesday, April 16, 2014

You Are Special Card

This You're Special card is for my daughter Megan. When my children were growing up, I used colors to help keep things organized. Megan's color was yellow and she loves yellow roses.


The background paper is a digital print from Daisy Company. I added a piece of ribbon that I think I picked up out of a dollar bin somewhere. The doily is a yellow paper doily that I distressed with yellow ink. The You Are Special digital image is another of the wonderful things available from Create with TLC. The two butterflies are also digital images; unfortunately, I didn't make record of where I found the set.

Note to self: ALWAYS add info to the file name so I can track back to the site where I obtained digital files. And a note to my readers: if you identify any digital papers or images I've used here and which I have not properly given credit for, PLEASE let me know so I can credit the source!


Three with Marbled Background Paper

Life certainly has a way of getting busy, doesn't it? The three cards I am sharing with you in this post I created on April 10th. I decided to see what I could make from some of the handmade marbled papers I made last year in a fun afternoon of crafting with my eldest daughter Venetta. I'd forgotten all about these papers until April 5th when I had my grandson Derick (13) over for the day and made more marbled papers with him.

If you aren't familiar with the fun of shaving cream marbling, you have to give it a try. You need a can of shaving cream, a large tray or jelly roll pan, a straight-edge to scrape shaving cream off your cardstock, white cardstock, and some kind of colors--liquid watercolors, diluted acrylic paints, food colors, or diluted inks. I happened to have ordered some replacement inks for a printer that I no longer have so had used those to make my own spray mists and used those for this. I also had a spray bottle of diluted liquid Rit dye, which my grandson and I LOVED, even though we had to wait a bit for it to dry.

So you spray your shaving cream onto the tray or pan. Do it up thick, about 1 1/2" or 2", and about the area of your cardstock. You will probably use up the whole can of shaving cream. For this purpose, I buy the cheap stuff at Dollar Tree. Once you have the shaving cream down, pick 2 or 3 colors to drizzle haphazardly over the shaving cream. At this point, it's a good idea to take a table knife or bamboo skewer and pull the it through the shaving cream to swirl the colors together. Take a sheet of cardstock and press it down gently on top of the shaving cream, trying to get full contact between the shaving cream and the cardstock. Gently lift it off, scrape off the shaving cream (which you can return to your pan), and voila!, you have a lovely marbled pattern. Lay the cardstock in a safe place to dry and do it all over again.

The shaving cream will get colored, too, after you've scooped and pressed and recolored it a number of times, but trust me, you can still get some really interesting prints so keep going. We also tried just spraying the colors on top of the shaving cream, which gives a completely different effect. Be creative and have fun with this! And if you need pictures, I'm sure you can find something on YouTube or in a Google search.

Okay, now on to the cards I made...


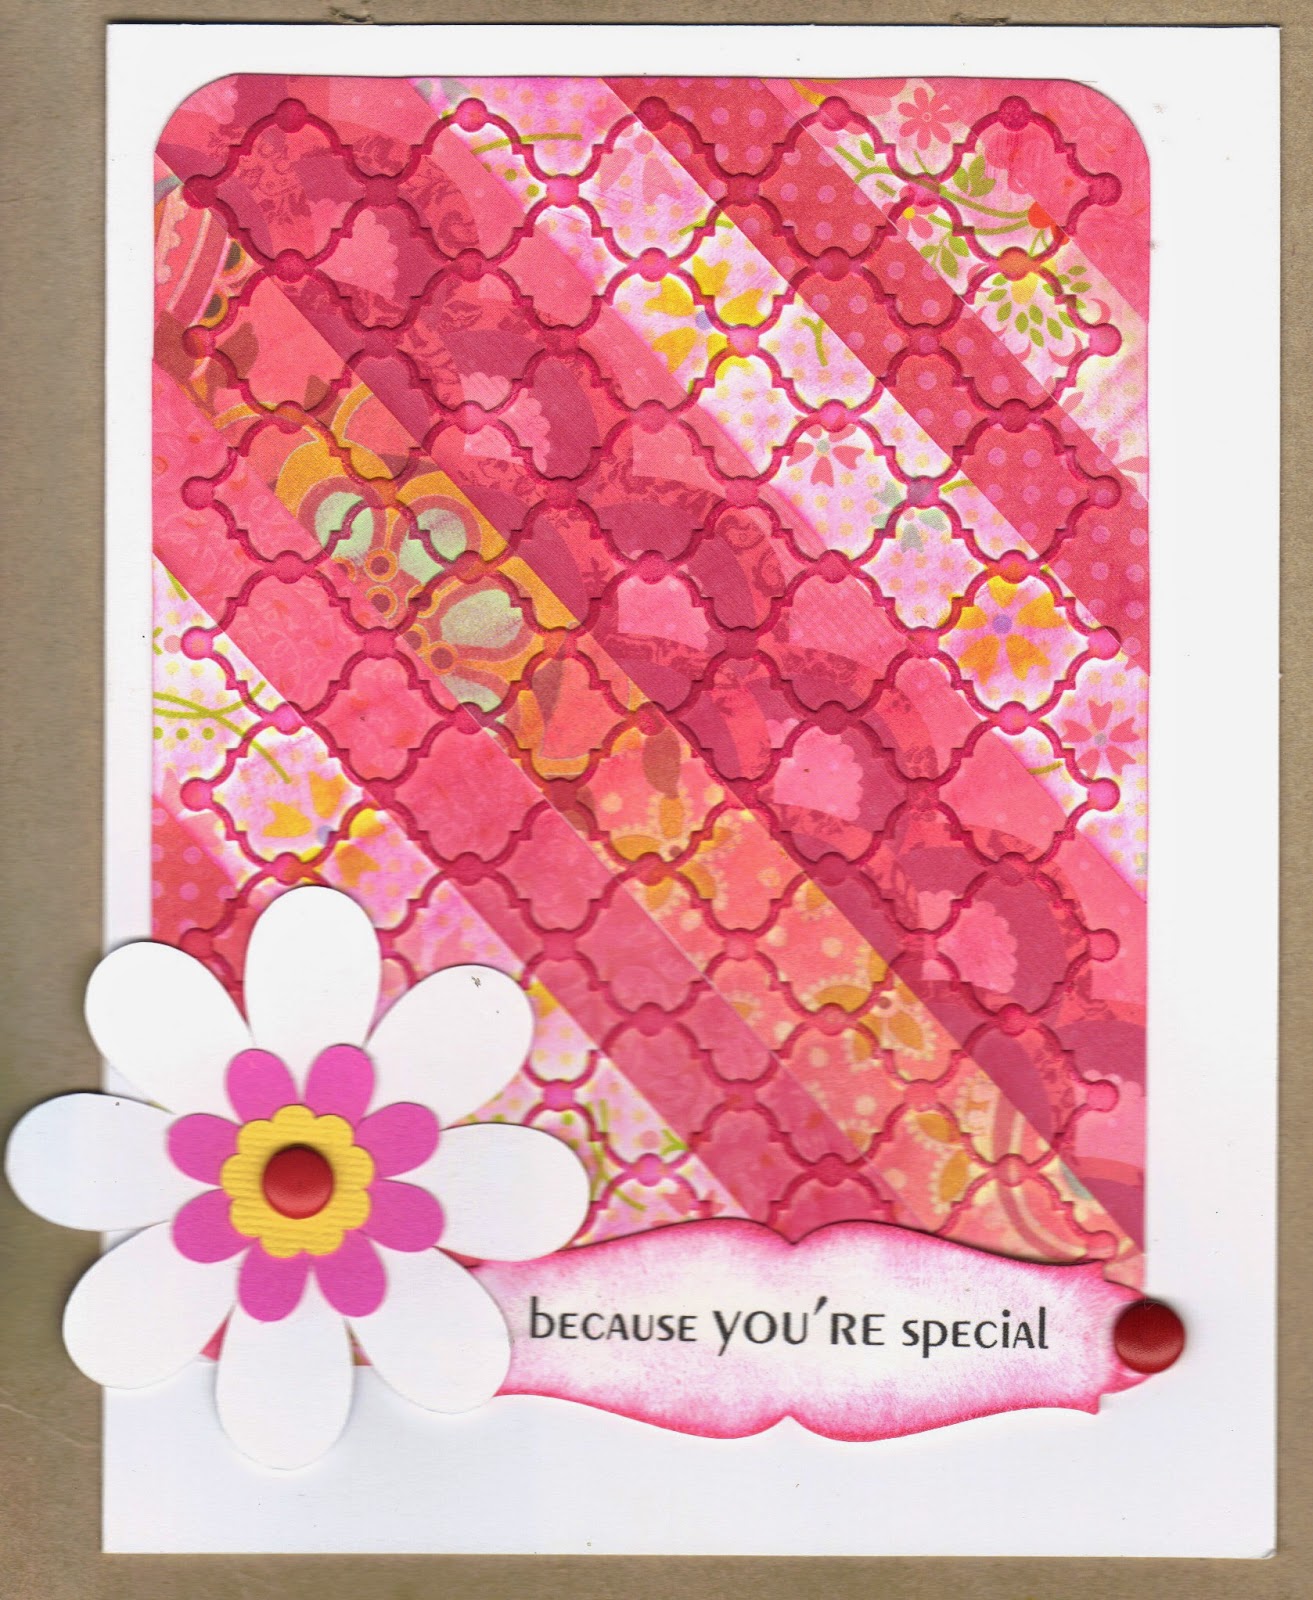
This Happy Birthday card went to our stepgranddaughter in Mississippi for her 9th birthday. I started with an A2 piece of marbled cardstock. Then I die-cut a corner butterfly swirl on my Silhouette Cameo and added Stickles accents to the butterfly. I used a pair of edger scissors to cut scallops on the front edge of the card. I added ink distressing to the edges of the back of the card. Finally I stamped the sentiment on the front.


This card went together rather quickly. I used an A2 piece of the marbled paper for the background, tied some embroidery thread around it, and stamped the sentiment in the corner. The Eiffel Tower image is digital art from Create with TLC. This card went to a female friend who was celebrating her 67th birthday.


Again, an A2 piece of the marbled paper, matted on a purple piece of cardstock that I edge-punched with the Martha Stewart doily edge punch. The oval with the rose was cut from an Easter egg in a set from Far Far Hill. I added a piece of ink-distressed paper doily behind the oval. The ticket is another digital design that I ink-distressed. The dots are Candi with a touch of Stickles. 

Wednesday, April 2, 2014

Two More Recently Made

This first card was made for my youngest grandson Allan's 5th birthday. The clown image is a digital print from Dearie Dolls. I LOVE her images! She offers most in color and in black & white. Please visit her site and be SURE to leave a thank you if you download any of her sweet images.

The paper here is again from ScrapbookScrapbook's circle set, only in the blue color way this time. I've used a scrap of blue cardstock behind the circle paper. The colored dots are Candi that are attached with foam pads.


This second card was for my youngest daughter Thea, for her You're Special day. I used a scrap of plaid paper for the background; I think it came from a DCWV Stack Pack 12" x 12". I have a LOT of those big packs! I also try very hard to use every scrap of patterned paper. Paper is definitely one of my weaknesses.

The floral image is a digital print. I'm not entirely sure where I originally got this image. It might be a Dover sampler or from a Far Far Hill set. I've attached it on top of a paper doily. I die-cut an arrow with my Silhouette Cameo from a scrap of cardstock. The sentiment is wordart compliments of Paulette at Create with TLC. I've added 3 striped Candi for that finishing touch. 


Now to explain about You're Special days...my husband and I stopped celebrating the holidays that are traditions of men back in 2004. These traditional holidays are specifically those that have replaced the holy days that Almighty God, YHWH, Creator of heavens and earth, commanded His people to observe. That means that we stopped celebrating Christmas and Easter specifically and do our best to observe Passover, the Feast of Unleavened Bread, First Fruits, Pentecost, Feast of Trumpets, Feast of Atonement, and Feast of Tabernacles. While I let go of all of the traditions associated with Christmas, I still wanted to have a special day for my children and grandchildren when I could celebrate them. Yes, I know they still have birthdays, but this would be my special day to celebrate them. I decided that the day six months from their birthday would be their You're Special day. And that's what this card is all about...as well as others that I post for my family for their You're Special days.

Friday, March 21, 2014

My Two Latest Cards

One of my clients is currently in a rehab nursing home so I wanted to send her a little card to let her know I was thinking of her. Here's what I made...


This cute little bunny is a Silhouette card. I used a purple cardstock for the base card. The floral print cardstock is from the Pretty Posies DCWV 12" x 12" stack. I cut the neck ribbon & bow from a scrap of bright pink cardstock. The purple accent on the bow is a Candi dot. I added the eye and nose with marker.

This is the first time I've used a Silhouette design to make a complete card. I like this one and will use it again. I might try making the printed part smaller and cut out a bunch to make a row of cute printed bunnies.

For the next card I needed a birthday card suitable for a gentleman in his late 80's. While this isn't typically a "guy" card, it was bright, colorful, and sure to add a bright spot to his day. He was happy with it and that's all that matters.


I began with red cardstock for the base. I added a piece of digital paper from the Circles collection available from ScrapbookScrapbook, one of my favorites. You'll find their web link in the sidebar. The cute clown is one of Mary Ellen's sweet images from Dearie Dolls. Her blog is in my blogroll. Her designs are offered in color or black & white. You will definitely want to check her out if you aren't already a follower of her free digital images. I mounted the clown panel on another piece of the red cardstock. The colorful dots are more Candi.

And there you have it!


Tuesday, March 18, 2014

Making a Guy Card

My son-in-law Shannon had a birthday Monday March 17. Making guy cards is always difficult because they don't typically like flowers, lace, ribbon, and all that stuff we usually like to stick on a card. In my family, the guys tend to like hunting and fishing and not much else. They don't wear suits and ties as a general rule. They don't golf or go bowling. That rules out a lot of the design ideas that I've seen on Pinterest and elsewhere. But my son-in-law LOVES driving in demolition derbies. He's been doing this since before he married my daughter Lois. I went to one once when Lois was still pregnant with their oldest, my grandson Kyler, who is now 14 and has already driven in two demolition derbies. Anyway, at that derby about 15 years ago the drivers were out for blood. It was more than just a smash-em-and-crash-em. In one of the heats (fortunately one that my son-in-law was NOT in!), they flipped one car upside down and then the other cars attempted to pile on top of it. The driver in the upside-down car could have been crushed! I walked around that arena praying the whole time that my son-in-law was driving. His car got disabled right away and he just sat in one place for most of his heat. He was not a happy camper about it, but considering that we were there with my pregnant daughter, I was thanking the LORD. Anyway, since that derby I've never attended another one. I don't care to watch my son-in-law and now my grandson, too, risk their necks just to be the best at crashing into other cars. Weird!

However, all of that led me to consider using a demo derby theme on my son-in-law's birthday card. So here's what I came up with...


The background paper is a digital print, but for the life of me, I can't find the website where I got it from (I have a LOT of digital files saved). The POW! and BAM! wordarts are courtesy of Paulette at TLC Creations. I colored them with Sharpie markers. The Voo-Rooom! wordart is another digital image, but unfortunately I don't have any record of the artist to whom credit is due. I drew the two little cars crashing into each other. 

I didn't hear from my son-in-law about how he liked the card, but my daughter who is his wife thought it was great and that he'd like it a lot. On the inside I wrote: Hope you have a smashing good birthday and come out on top.

And that's how I made my latest guy card.

Monday, March 10, 2014

Double Nickel Birthday Card

I have one brother living, Mike, who is two years younger than me. I'm the oldest. I also have one younger sister, Annette. Mike's 55th birthday is tomorrow. While I was talking to my Mom on the phone yesterday, she reminded me that Mike is now the same age as the speed limit. That prompted this card...


The background paper on this card is courtesy of Paulette at Create with TLC. The speed limit sign is a Silhouette Cameo file; I had to use one of my computer fonts to get the 55, though. The post is a wooden coffee stirrer that I colored with Sharpie marker. The image with the car comes from Clearly Vintage. The ticket is a stamp set from Papertrey Ink called Just the Ticket.

Friday, March 7, 2014

A Look Back at February 2013

One of the interesting aspects of keeping a pic of every card I make is being able to go back later and see how productive I was. I was surprised to see how few cards I made in February 2013. I think I know why. This was my last semester of college and I was in my student teaching placement. I was working in a third grade classroom--probably my favorite grade to work with--and didn't have much time to spend making cards. Here are the four I did make at that time...


I believe the background papers here are digital prints by Booland Designs, which I purchased from Digital Scrapbooking Studio. You can find their link on the sidebar list of my favorite websites. The wordart banner is from Create with TLC. I am trying to remember where I got the floral print; I do know it's a digital design that I printed out, but I can't remember where I got it.


This card is all stamped, but uses the layer technique. I really like how this turned out and need to do this again.


For this one, I tried imitating a technique I saw online, probably on a card I pinned on Pinterest. The tricky part was centering the butterfly punch in the middle of the white squares. The white squares are mounted with foam adhesive on top of the colored squares. I wrote the sentiment across the bottom.


The background paper I used here is another Booland Design. The image was cut from a calendar. I like to recycle images from calendars, catalogs, and other print media.

Thursday, March 6, 2014

A Look Back at January 2013

I thought I'd catch up on some more recent card projects this time so I'm only going back to 2013. I'm starting at the beginning of the year and only doing a month at a time. So here are the cards I made in January 2013....


This card, while pretty, has one of those "do-not-do-this-again" oops on it. For future reference, do not use Crystal Accents to adhere lace to a card--it shows. The papers here are digital prints.


The colored background on this card was made by melting crayon shavings onto an old book page. Use an old iron and make sure you have extra old papers over the colored shavings so you don't melt them onto the bottom of the iron. I had the iron on it's hottest setting.


The two blue finial embellishments were leftovers from a Silhouette Cameo die-cutting project. The leftovers after you die-cut something can be a bonus; you just have to think outside the box. The background paper is a digital print. The sweet little birthday girl is from Dearie Dolls. You'll find the link in my blog roll.


This card uses another digital paper for the background. I apologize for not keeping track of which company I got this from. I have a LOT of digital paper designs, some I've bought, some I've gotten free. You can also make your own if you have the right software programs.


The cute little plane and it's banner are from Papertrey Ink, one of my favorite stamp companies. The row of little green houses is the result of another Silhouette Cameo die-cut leftover.  The background papers are more digital prints.


This card makes use of a cool technique I came across. You take thin strips of your paper scraps, adhere them on a piece of cardstock, run them through a Big Shot or Cuttlebug in your favorite embossing folder (I used Swiss Dots), and use that to make a panel for the front of your card. I love this technique and have thin strips of paper saved just to make more of these.


On this card I used actual leftover fabric strips to make the background; I sewed them on my sewing machine. The tricky part is getting them to stay in place while you sew. A narrow strip of double-sided adhesive applied to the center of each fabric strip was a big help with this! I think I'll use iron-on interfacing next time, though. Oh, and you don't want to stitch through the adhesive; it gums up your needle too much and you'll have a nasty mess very quickly.


This card uses one of the wonderful wordarts I've accumulated from Paulette at Create with TLC. You'll find her blog in my blog roll. I cannot say enough good things about her blog and all the wonderful freebies she shares! She does some terrific blog hops every so often and has a fabulous store, too! If you aren't already following her, you'll definitely want to check her blog out. Many of the wordarts, images, and some of the papers  I use come from Create with TLC. I know the paper on this card is a digital print but it's not from Create with TLC; I don't remember exactly where I found it, but I'm guessing it came from a set you can find for free on ScrapbookScrapbook (link on the side of my blog).


That gorgeous flower is from Fred She Said--LOVE her designs!


This card has another pieced and stitched background, all papers this time, with another Create with TLC wordart. Off hand, I can't remember if the card image came from her or from Clearly Vintage.


The background paper is a digital print. I believe the image and the wordart is from Create with TLC. The strip with the ships on it is from Go Make Something, another site I really like.


This card has another pieced and stitched paper background. The image is one I purchased from PC Crafter, a company with digital clipart that I loved, but has unfortunately closed up shop. I'm so glad I purchased the sets that I did before they went out of business. I only wish I'd had the $$ to purchase many more of the sets I had on my wishlist there.


Monday, March 3, 2014

A Look Back at 2009 Part 7

I'm getting towards the end....


There! That's the last of the cards from 2009 that I want to share. You can all breathe a sigh of relief now!